Fix The Finals Error Code Tfav0012 System Integrity Violation On Pc

This command is provided in the article description. Copy it and paste it over here. Hit the enter key now once this is done. Now you have to, once you run the command, uninstall D. To uninstall D now to uninstall Dr type in control panel in the Windows search box, then click on control panel, then click on uninstall a program, and over here you can find D in the list.
So here you can see DCE for Windows. Make a right click, then click on uninstall, and click on. Yes, in the future, if you want to reinstall it, you can always reinstall it from Microsoft's website. So this process will take some time, so let it uninstall first, and then you have to click yes to restart your computer.
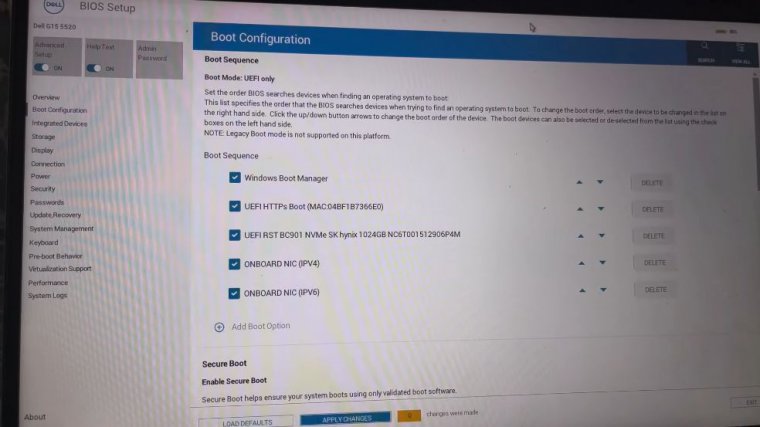
Make sure that you restart your computer. After this, I'm not restarting, but make sure that you restart your computer. So, restart your computer, and after the system restarts, you can launch the game and then check. This has worked for many players, so it might work for you. The next step is to enable secure boot in system bios, so go to your system bios, whichever brand you have.

If you have Dell, HP, or Lenovo, whichever brand you have, you can search in Google for how to go to system bios, so go to your system bios and enable the secure boot. If it is disabled, now once you go to the system bios, go to the boot option, so find the boot option in your system bios. and I'm showing it with Del Computer; this is just an example.
So go to your system bios and then go to the boot option, and over here you can see boot mode is set to UEFI in my case, and then you have to enable the secure boot, so scroll down here you can see secure boot, and it is disabled right now. To enable it, you can turn this on over here and then apply it at the bottom.
And now you can restart the computer. You can exit and then restart your computer. Now the next step is to enable SEC-secure virtual machines in the system BIOS. If virtualization is disabled in the system BIOS, you can go to the system BIOS and enable it. You can also Google the motherboard. If you have whichever motherboard you have, you have to Google the motherboard, and then you can.
It will let you know where to enable the svm in your system bios, so go to your system bios and enable the svm. Now go to system bios and then find virtualization support. In my case, the option is virtualization support in your system, and this is with the D model, so in your system you can find it where you can find the virtualization support, and then if this virtual support is turned off, you can turn it on over here, and once you enable it on the bottom, click on apply changes and then click on okay, and then exit and then restart.
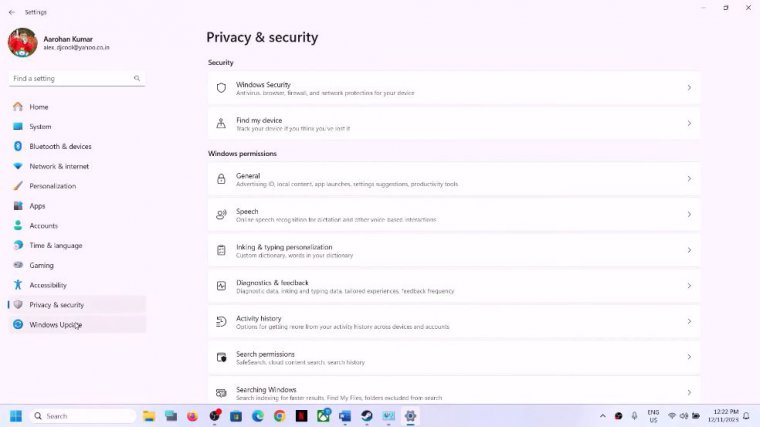
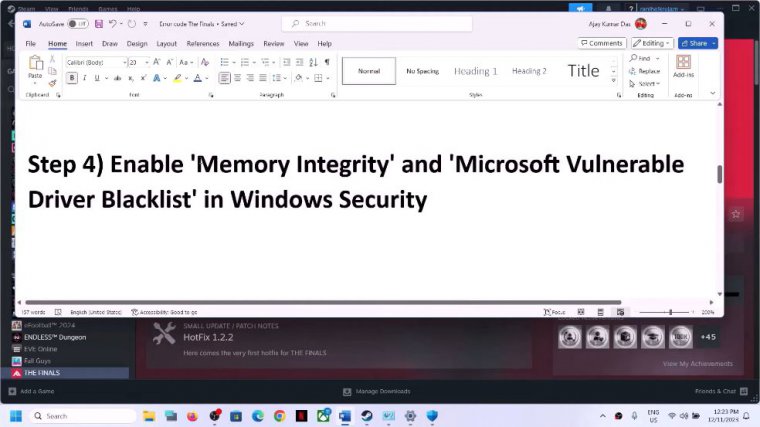
The next step is to enable memory integrity and the Microsoft vulnerable driver blacklist in the system under Windows security. Now for this, open Windows settings and then go to privacy and security. If you have Windows 11, if you have Windows 10, you will have an option to update in security, then click on Windows security.
Now over here, you can see device, security, Now go to core isolation and click on core isolation details. If memory integrity is off, turn it on. If this is off, turn it on. Yes, and then, in my case, please ignore this. If you are able to enable it, you can enable it. If you're not able to enable it, just ignore it now.

Scroll down over here. You can see the Microsoft vulnerable driver block list now. If this is disabled in my case, this option is graded out. Now, in your case, if this is highlighted, if this is not highlighted, if it is graded out like this, you can ignore this, so turn on memory integrity. Turn on this kernel mode.
Hardware enforces stack production, If you're able to, and if you're able to turn on this option, turn it on. If you're not able to, then you can ignore this. Once this is on, restart your computer after the system restarts. You can launch the game. If you're unable to enable this option in Windows security in that case you can follow the next step to make changes in the registry.
You can go to this location, type in registry editor in the Windows search box, and then click on registry editor. Click yes to allow. Now you have to expand the H key local machine and then expand. The system now expands current control. Set now and expand control now over here, expand CI, and then select config.
Once you select config on the right-hand side here, you can see the vulnerable driver block list enabled. Make a double click and set the value of the data to one. If this is zero or something else, just type in one over here, click okay, and then close this. Now, restart your computer. A system restart is a must, and after the system restart, you can launch the game and then check.
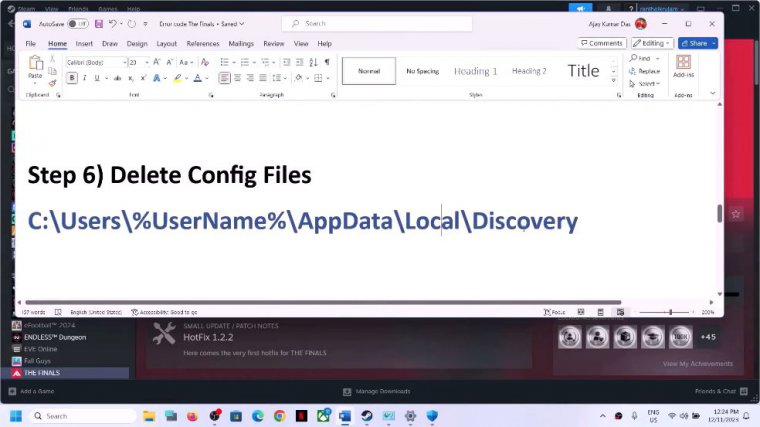
The next step is to delete the config file, so go to the go to this location, open the C drive, and now open this PC. Select this PC. Open the C drive, then open the users folder, and then open your username folder. Now open the app data. If you don't see app data over here on the top, click on view, then select show, and then put a check on hidden items.
You should be able to see the app data folder. If you have Windows 10 somewhere over here, you will find the view option. Click on view, and then somewhere over here you'll find the hidden items box. Put a check on hidden items, and then open the app data folder. Now open the local folder. Now open the discovery folder.
So if you find Discovery folder open the discovery folder, open the discovery folder. Now open the discovery folder. Over here, you will see these config files, so you have to delete them. Then, once you open the discovery folder, you can delete this You can delete the complete Discovery folder now.
When you delete the Discovery folder, you will lose all the game progress and you will lose all the saved settings. So if you agree, you can make a right click and then click on delete. Once this is deleted, restart your computer, and then launch the game. Now the next step is to uninstall and reinstall Easy Antiche.
Now for this, make a right-click on the game, select manage, then click on browse local files. It will go to the game installation folder. Now over here, you can see uninstall. Easy antivirus, file, Make a double click, click on Yes, or you can make a right click and then click on Run as Administrator.
Click on Yes, and once that is done, make a right-click on Install Easy Anti-Cheet, and then click on Run as Administrator. Click on yes, and once this is done, you can launch the game. If you're still facing the problem in that case, you can right-click on Uninstall Easy Anti-Cheat and then click on Run as Administrator.