Broken Light Tech - One Shot Anyone The Finals

Holy sh*t, yeah, okay, so it turns out that the light class can one-hot Heavies, you've probably heard about using the nuke. Every single heavy has been using this for, like, the last 3 to 4 weeks. It's something that has existed through beta but only really started getting popular since launch, so let me show you what the nuke is.
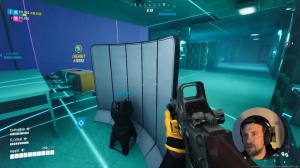
You would grab a C4 and place one C4 between two C4s. On an explosive barrel, and then you take this over to another unsuspecting player, and this thing does like 400 damage, so we've got a lovely little heavy player over here, so we Pro that out. Blow it up and heavy has, he's just gone he's absolutely gone and that's pre 150 HP all gone all in one go so Heavies had this but there's a Twist yesterday we went crew and I thought if Heavies can do that with the C4, why can't lights do that with a breaching charge so what we discovered was the reason why lights can't do it or why no one has been doing it is because you can only put one breaching charge down and then you have to wait for it to charge up and the problem is this one breaching charge isn't enough to blow the canister up look it's over here that is the canister we just tried blowing up it's not enough so you'd have to effectively.

Place one down and then wait for your second one to charge up, and this is just not going to happen in a real-life example. This is the other thing, which is really surprising: if we place a breaching device on there and then if we set that off and it explodes, this breaching device doesn't explode; it's still here.
We can actually pick that up and use it again once you do have two on there, though you can throw that off and explode it, and it's basically the same as the regular nuke. But there's a catch to this. One breaching charge isn't enough to blow it up; you have to make this have less health because if you have a breaching charge on here but the canister has less health, you can blow it up in one hit.
Now there's a couple ways of making it so that the canister has less health, right? You could probably find out, like, the exact number of shots you need to shoot it so that you can blow it up, and it just blows up, which is going to be awkward, but it will work. But this is a different way of doing it.

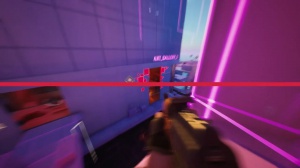
Okay What you want to do, and this will be important in a little bit, is put the breaching charge on the bottom. It has to go on the bottom, and we'll cover that in a sec when you throw these cans out as they fly. They deplete health, so let's just say that this is 100%. Health Okay, as it flies, the health depletes, and when it gets to zero, it just explodes.
That's what gives you the whole flying and exploding. That's why sometimes you can have impact on walls where it will explode, and sometimes it doesn't, because if we go here and impact onto the wall, it's just going to bounce off because that impact onto the wall isn't enough damage to blow it up, but if you go a lot further, that damage is enough, so if you guys now understand the concept of depleting health.

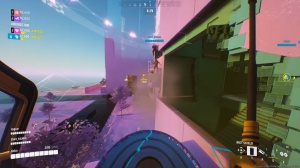
There's a certain point where it depletes enough for one of these chargs to blow it up, and it turns out that distance is around 16 M, so 16. M it just blows everything up. If you can blow the canister and the breaching charge up, then you've got a double explosion, and what then happens? Is this heavy over here as long as we are 12 13 14 15 16.
M he's gone with one breaching charge, so let me now show you why it's important that you have to put it on the bottom because, basically, even though we are allowed to fly for 16 miles and then blow the thing up, the problem is that if we put out a canister like this but our breaching charges are on the side, if we go again with the same kind of distance and blow it up, you see how it pushes it off to the side because we have the breaching charge on the side of the canister, it puts it off to the side.

So when you throw it out and blow it up, it just alters its direction, and then it blows up a second time, and those two individual explosions are not enough to take out the heavy, hence why you put it on the bottom. And then you throw it out and blow it up basically once it's gone the 16 M it's enough and it just blows both of them up and you don't have that whole thing where it flies off into a different direction and you miss the second explosion, that's why it's super important the way I have been doing it and this is why what I'll be suggesting you guys try and follow as well try and aim for a direct hit or at least close to and as soon as you see like the hit marker of it hitting, then blow it up, because that timing is basically like, perfect.
So, I mean, you see, it didn't actually quite get him because the explosion went over here, but even then, he was down at like two hit points. One other thing you could probably do as well if you really needed to get it a little bit closer. We know that by throwing this out and blowing it up, it's not going to work, but you could try it, catch it, and then blow it up, which takes a little bit more practice.
And it's all about the timing, but yeah, if you can do that, then it would totally work. Wednesdays and Fridays, or join our amazing community on Discord, and I'll catch you in the next